Posts Tagged ‘CUCM’

Wow, am I old or is Cisco moving at about 3 revisions a year? I think the first was correct.. Oh well. I have a huge 8.x project coming up for a client and so I have been installing a lab version to play around with. Last night I tried to MAP my lab UC appliance from a Windows machine, then I remember that this changed as of CCM 5.x….

So I’m sure you remember the “good old days” of CCM 4.x? You can do almost everything on the box. Because it’s in fact a Windows 2000 box. However, this brings security and supportability issues.

With the introduction of Linux-based Unified Communication appliance (CUCM 5.x – 8.x), Cisco locked down the box. You can only access the box via admin web page or a tailored command line.

One of the inconveniences is to review log files. On the old-school CCM 4.x, you may just view the logs in C:\Program Files\Cisco\Trace. On the new UC appliance, you’ll have to use RTMT (RealTime Monitoring Tool). This is especially annoying if you’re testing your system. For each test, you’ll have to download a new set of logs to your computer. (though you may use ‘Remote Browse’ in RTMT, its function is very limited)

What if we can go back to the “good old days” and view the file system just like a Windows drive? I think I discovered a way to do it on a forum site.

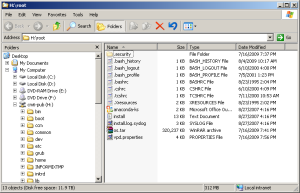
Take a look at the screenshot below. It’s a CUCM 6.1.4 mapped to my Windows XP laptop. You can read/write files on CUCM just like a local hard drive. For those people who are not a fan of VI, you may use your favorite editor (such as Notepad++/UltraEdit). And you may use any Windows tools, such as Windows search, WinGrep, WinZip, etc. How’s that? 🙂

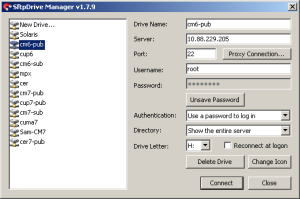
To achieve this, you need two things: a root account on CUCM and a software who can map a SFTP server to a network drive (such as sFTPdrive).

 BAM issue solved. In closing I must admit, I was one of the Cisco CCVP’s at Cisco Live asking developers WHEN ARE YOU GOING TO STOP USING WINDOWS? – Soon my friend, soon.. So I would trade this inconvenience any day to keep from having to deal with Microsoft.

Modify Cisco License MAC

Posted: May 24, 2012 in Cisco CallManager, CUCM
Tags: , , ,

Cisco used to bind license file to physical MAC address.  Now, it moves to “License MAC”, which is a hash value of multiple system parameters such as NIC speed, NTP, DNS, hostname, etc.

To view the license MAC, you need to install the system first (CUCM, UCCX, CUPS, etc.).  Then use the “show status” command.

This is somehow inconvenient:

1) You cannot get the license file before finishing the installation.

I personally prefer to get everything ready before starting the installation, such as IP address, hostname, password, license file, installation media, etc.  You could run into lots of surprises when trying to get the license file.

2) When the system parameter was changed, the license file yield invalid.

For example, you add/change DNS server settings on the system, which is pretty common during system integration.

It would be better if you could dictate what license MAC the system use.  You may also use some schema like: AABBCCDDEEFF, where AA is the product code, BB is the site code, CC is the node number, DD is the version number, etc.

In the example above, the “License MAC” was changed to “abcdef123456”.

Since you can use whatever License MAC you like, you may:

  • Get the license file before the system was installed
  • Keep using the same license file after system parameters was changed (such as DNS)

To specify the license MAC, you need to have root access to the system.  Then you’ll modify the file /usr/local/bin/base_scripts/LicenseMac.sh.  To the bottom of the file, replace the line

FinalString=`expr substr “$SHA1sum” 1 12`

to

FinalString=”abcdef123456″

In newer versions, you might have to change the /etc/selinux/config file so that selinux runs in permissive mode.
Reminder: Don’t be evil.  😉 – and be sure to pay it forward!!!
(R) 2012

I had an interesting case last week where calls over ICT trunk would connect but then either party will not hear each other for 8-10 seconds.

The issue was first reported from US users trying to reach UK users over an Inter-cluster trunk (Non-GK). Both clusters had two call managers version 8.0.3. The whole issue started after US call managers were re-located and their IP addresses were changed. The ping response between two clusters was about 145ms which wasn’t too bad. I did a test call to a UK phone by connecting my IP communicator to US (due to time difference it was very difficult to get someone in US to make test calls). I did a CFA on UK phone to Voicemail and could see on my communicator that the call has connected but I didn’t hear the first 10 seconds of the voicemail.

I made a similar test by calling a UK phone but this time asked someone to answer it. The call was connected fine but we couldn’t hear each other for like 10 seconds. After 10 s it was all ok.

The issue was bit different when someone from UK to US would call. In that case call will connect 70% of the time with no issues but 30% of the time it will connect and drop.

I had to run through different CCM traces on both clusters to find below:

### Digit analysis for the call
04:42:47.464 |Digit analysis: match(pi=”2″, fqcn=”XXXXXX1409″, cn=”1409″,plv=”5″, pss=”PT_FRNA_INTERNAL:PT_FRNA_ROUTE”, TodFilteredPss=”PT_FRNA_INTERNAL:PT_FRNA_ROUTE”, dd=”303165″,dac=”0″)|2,100,49,1.20123926^10.128.68.1^SEP002318D1DF43
04:42:47.464 |Digit analysis: analysis results|2,100,49,1.20123926^10.128.68.1^SEP002318D1DF43
04:42:47.464 ||PretransformCallingPartyNumber=1409
|CallingPartyNumber=201409
|DialingPartition=PT_FRNA_INTERNAL
|DialingPattern=21XXXX
|FullyQualifiedCalledPartyNumber=303165

04:42:47.464 |DeviceManager::star_DmPidReq – RequestedName=dec100fa-40c7-ac1a-9dcb-50a73af41700 LookupName=dec100fa-40c7-ac1a-9dcb-50a73af41700|2,100,49,1.20123926^10.128.68.1^SEP002318D1DF43
04:42:47.464 |Digit analysis: wait_DmPidRes- Partition=[8a2bfaaa-13f0-4631-9c26-02a08a573cf7] Pattern=[21XXXX] Where=[],cmDeviceType=[AccessDevice], OutsideDialtone =[0], DeviceOverride=[0], PID=RouteListControl(2,100,73,10)|2,100,49,1.20123926^10.128.68.1^SEP002318D1DF43

### H225 set-up sent via ICT:
04:42:47.616 |Out Message — H225SetupMsg — Protocol= H225Protocol|*^*^*
04:42:47.616 |Ie – H225BearerCapabilityIe IEData= 04 03 80 90 A2 |*^*^*
04:42:47.616 |Ie – Q931DisplayIe IEData= 28 0B 43 68 61 64 20 48 61 69 6E 65 73 |*^*^*
04:42:47.616 |Ie – H225CallingPartyIe IEData= 6C 08 00 81 32 30 31 34 30 39 |*^*^*
04:42:47.616 |Ie – Q931CalledPartyIe IEData= 70 05 80 33 30 36 33 |*^*^*

### Connect received (call answered)
04:42:49.461 |In  Message — H225ConnectMsg — Protocol= H225Protocol|*^*^*
04:42:49.461 |Ie – H225BearerCapabilityIe — IEData= 04 03 80 90 A2 |*^*^*
04:42:49.461 |Ie – Q931DisplayIe — IEData= 28 0C 53 74 65 76 65 20 47 61 72 6E 65 72 |*^*^*
04:42:49.461 |Ie – Q931ConnectedNumIe — IEData= 4C 06 00 81 33 30 36 33 |*^*^*

### outgoing TCS sent after about 8 seconds:
04:42:57.260 |TranslateAndTransport(21728)::waitForSdlRsp_H245TcpConnectionInfo – received H245TcpConnectionInfo from H245Handler|0,0,0,0.0^*^*
04:42:57.264 |
H245ASN – TtPid=(21728) -Outgoing #195026  -value MultimediaSystemControlMessage ::= request : terminalCapabilitySet :

¬Also, the SDL logs indicate a significant delay in the TCS being sent out:
Line 135: 027643128| 2011/07/06 04:42:49.465| 002| SdlSig    | H245ConnectReq                        | wait                          | H245Handler(2,100,24,1)         | TranslateAndTransport(2,100,16,21728)| (2,100,23,21728).1-(*:*)                | [NP – PQ: 0]
Line 331: 027643324| 2011/07/06 04:42:57.259| 002| SdlSig    | H245TcpConnectionInfo                 | waitForSdlRsp                 | TranslateAndTransport(2,100,16,21728)| H245Handler(2,100,24,1)         | (0,0,0,0).0-(*:*)                       | [R:NP – HP: 0, NP: 0, LP: 0, VLP: 0, LZP: 0 DBP: 0]
Line 332: 027643325| 2011/07/06 04:42:57.259| 002| SdlSig    | TtControlChannelEstablished           | waitForTransportEstablishment | H245SessionManager(2,100,23,21728)| TranslateAndTransport(2,100,16,21728)| (0,0,0,0).0-(*:*)                       | [R:NP – HP: 0, NP: 0, LP: 0, VLP: 0, LZP: 0 DBP: 0]
Lin

This shows the H225 part of H323 is fine but H245 was taking time. I did reset of trunks, changed Call manager priorities etc but that didn’t help.

I then enabled ‘Outbound FastStart’ for all outbound calls from US to UK and enabled the same for inbound calls on UK trunk. This fixed the issue.

I had to provide a MTP resource under MRGL at US trunk as FastStart needs MTP.

US Cluster:

UK Cluster:

A little about how ‘Outbound FastStart’ works from Cisco:

Outbound Calls :

Enable Outbound FastStart   

Check this check box to enable the H.323 FastStart feature on outgoing calls.
By default, the check box remains unchecked for the H.323 gateway or trunk.
When you check the Enable Outbound FastStart check box, you must set the Media Termination Point Required, Media Resource Group Lists, and Codec for Outbound FastStart.

Inbound Calls:

Enable Outbound FastStart   

Check this check box to enable the H.323 FastStart call connections on incoming calls.
By default, the check box remains unchecked for the H.323 gateway.
For intercluster calls, you must check the Enable Inbound FastStart check box on Cisco CallManager servers in other clusters for the outbound FastStart feature to work.
If you updated Cisco CallManager 3.3(2) servers in other clusters with support patch B, do not enable inbound FastStart because 3.3(2)spB does not support the inbound FastStart feature over intercluster trunks
These are the steps involved (considering Call manager Linux versions):

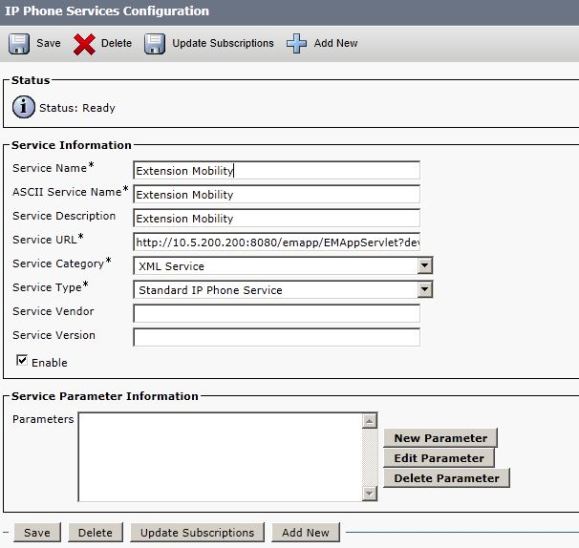
1 – Configure extension mobility service by going into Device > Device settings > Phone Services

The service URL is : http://call-manager-IP:8080/emapp/EMAppServlet?device=#DEVICENAME#

If you want to set it up as an Enterprise service then check that box “Enterprise Subscription” otherwise leave it. If you check that box, extension mobility service will appear globally for all phones and you won’t be able to find this service under phone Subscribe services in Step 2. If you don’t check that box then move to step 2

2 – Under phone, susbcribe this service as follows by dropping down the menu at top right corner and then going into “Subscribe/Unsubscribe Service”

3- Staying on the same phone page, scroll down and check the extension mobility check box otherwise no one will be able to login:

4 – Create a User device profile Device > Device Settings > Device profile. Any higher generation phone profile will work on lower one but that’s not true the other way around. So a Cisco 7960 device profile can be used to login oo a 7912 phone but a Cisco 7912 UDP won’t login on a Cisco 7960 phone.

5 – After creating UDP, the most important and sometimes missed step is to subscribe the Extension mobility service again like step 2 at UDP level

6 – Go into user from from User management > End user and add that device profile to it. Also select the primary extension at that user page.

Login and you should be good to go. Any issues, it would either be related to service not subscribed at UDP level or a UDP not associated with a user.

Web Link for EM:

There can be a situation where your Pub is down or inaccessible and users wants to login or logout. As EM service is dependent on Publisher they won’t be able to login/logout and will get “host not found”.

There is a workaround where users can login to their phones through a web link.

To login using URL:

http://<CUCM-SUB IP Address>/emapp/EMAppServlet?device=MACADDR&userid=USERID&seq=XXXXX

XXXXX = Pin

Example:

http://192.168.70.11/emapp/EMAppServlet?device=SEP001E4AF0F9E4&userid=ajon&seq=12345

To logout the user:

http://&lt; CUCM-SUB IP Address>/emapp/EMAppServlet?device=SEP001646D97913&doLogout=true

Had a bizarre issue with one of the customer where they were trying to dial an internal extension and it was going to a mobile phone. There were no CFA/CFNA/CFB set on the extension itself but for some reason it was following this path. The Call manager version was 6.x.

The call routing was designed in a way that when they dial any 7614XXXX extension, it hits a TP (7614XXXX )and gets translated to 60447614XXXX. For testing we dialed several 7614XXXX numbers and they all went fine to corresponding 60447614XXXX except when they dialed 76146920. As soon as they dial that number you will see on the display that it’s going to an outside mobile number.

I had to dig into traces where I found for some reason it is not even hitting the Translation pattern at all and was getting intercepted by a pattern 76146920 with a Time of Day routing on it which had that mobile number setup during a certain period of time. But when I checked, there was no such TOD routing setup on this extension,  moreover there was no such extension 76146920 which exist in the system. I ran some CLI commands to find if there are any database entries for this extension and found none. Customer told me that they use to have extensions like 7614XXXX before they migrated all extensions to 60447614XXXX which means may be previously someone did setup a CFA on this extension which is still stuck in it’s database.

|VoiceMailPilotNumber=
|RouteBlockFlag=BlockThisPattern <———block
|RouteBlockCause=1
|AlertingName=
|UnicodeDisplayName=
|DisplayNameLocale=33
|InterceptPartition=Internal
|InterceptPattern=76146920

cfa     = 755XXXXXX <———– Mobile number

This is what I did to resolve the issue:

  • Created an internal extension 76146920 and put it in Internal Partition
  • Assigned the extension to a dummy phone
  • Put a Call Forward ALL on the extension to some internal number
  • Made a test call which now hits this newly created DN and goes to that CFA internal extension
  • Removed CFA and saved
  • Deleted the DN 76146920
  • Made a test call and this time it was ringing the phone 604476146920


This was just a one off issue and Cisco TAC later confirmed that old versions of CCM may come across these kind of issues. This is rare but I thought to share it for the benefit of everyone.

An intercom line is one of those ‘must-have’ functions that must be available on every PBX. Fortunately, CUCM does have this function, but on the other hand, the documentation explaining how the feature works and its related configuration is not so accurate. Anyway, here’s my attempt at configuring this simple, but very handy feature in CUCM 6.x – 8.x:

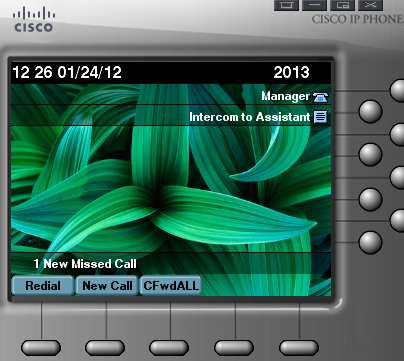
Before I begin, I want to mention that an intercom line is represented by a Directory Number (DN) as is the case with any dial-able entity. Now that we have that out of the way, the first thing one needs to understand is how an intercom line works. Simply put, a user (generally a manager) presses an intercom line button on their phone and it dials the intercom line on other user’s (generally an assistant) phone and the call is auto-answered at this user’s end. However, the second user can only listen to the first user’s voice, but their own phone is muted by default. The general idea behind the intercom line is for a manager to speed-dial into a second user’s phone and have it auto-answer at the receiving end in muted mode. This allows the manager to deliver a quick, one-way audio message to the assistant. If the assistant wishes to respond back to the manager, they can hit the intercom line button on their phone and initiate a two-way conversation;  just like a normal phone call.

The intercom line is an additional line on an IP phone that is configured to reach another intercom line on another IP phone. Intercom lines are configured with “Intercom Partitions” and “Intercom Calling Search Spaces” and therefore only intercom lines can reach other intercom lines. When a user presses the intercom line on their IP phone, they can manually (or configure it to automatically) dial the corresponding intercom line on the other IP phone. Generally, a Manager will have an intercom line to their Assistant’s phone, which will be the scenario for our example.

The setup:

A manager would like to have an intercom line to their assistant such that they would simply need to press the line button and have the assistant’s phone auto-answer (in muted mode). The intercom should not work in reverse, that is, the assistant should not be able to speed-dial the manager’s intercom line.

The configuration:

– Create two ‘Intercom partitions’ for the Manager and the Assistant’s intercom DNs by navigating to Call Routing -> Intercom -> Intercom Route Partition. Title the partitions something along the lines of “PT-INTERCOM-MANAGER” and “PT-INTERCOM-ASSISTANT”.

– Create two ‘Intercom CSSs’ for the Manager and the Assistant’s intercom DNs by navigating to Call Routing -> Intercom -> Intercom Calling Search Space. Title the CSSs something along the lines of “CSS-INTERCOM-MANAGER” and “CSS-INTERCOM-ASSISTANT”. Configure the Manager CSS to contain the Assistant’s Intercom partition (PT-INTERCOM-ASSISTANT) so that the Manager’s Intercom CSS will having dialing access to the Assistant’s intercom DN. The Assistants Intercom CSS will also contain the Assistant’s intercom partition only because the CSS cannot be left empty.

You’re probably wondering why we need to set up a CSS for the assistant since they won’t need any dialing privileges on their intercom line, however, both intercom partition and intercom CSSs are mandatory configuration entities for any intercom line regardless of the requirement. Go figure!

– Create an ‘Intercom Directory Number’ for the manager’s phone by navigating to Call Routing -> Intercom -> Intercom Directory Number as show in Figure 1. We will configure 3000 as the Manager’s Intercom DN.

Figure 1 – Intercom Directory Number Configuration for Manager

– Create a second ‘Intercom Directory Number’ for the assistant’s phone as show in Figure 2. We will configure 3001 as the Manager’s Intercom DN.

Figure 2 – Intercom Directory Number Configuration for Assistant

– Add an intercom line to the Manager’s phone by navigating to Device ->Phone and then selecting the phone to which the intercom line will be added. Click on the “Modify Button Items” button as show in figure 3. A small window may pop-up that reads: “Unsaved Changes may be lost! Continue?”. Click on OK and the “Reorder Phone Button Configuration” window will pop-up.

Figure 3 – “Modify Button Items” under the Phone Configuration window

– Highlight the ‘Intercom [1] – Add a new intercom’ option under the “Unassigned Associated Items” box on the right side of the window and press the “<” button to move the intercom line into the left box (Associated Items). Rearrange this option and place it in the line position where it will appear on the phone as shown in Figures 4 and 5. Note: The number of options in the left box must correspond to the number of lines on the phone. Hence, one of the unused lines may have to be moved over into the right box before the intercom option can be moved here. If this hasn’t been done and the user attempts to add an intercom line to the left box, the following error will be received: “Must Remove An Item From Associated List Before This Operation is Allowed”.

Figure 4 – Reorder Phone Button Configuration window Step 1

Figure 5 – Reorder Phone Button Configuration window Step 2

– Click on “Save” and then “Close”.

– Under the second line (where the intercom was configured) will now read: “Intercom [1] – Add a new Intercom”. Click on this link and on the next page enter the DN (3000 in our example) in the ‘Intercom Directory Number’ field and hit “tab”. The remaining fields will be automatically pulled from the Intercom Directory Number settings configured earlier as illustrated in Figure 6.

– The following fields may be entered if desired (Shown in Figure 6):

Display (Internal Caller ID)

ASCII Display (Internal Caller ID)

Line Text Label

ASCII Line Text Label

Figure 6 – Intercom Directory Configuration Window

– The “Speed Dial” field will set the intercom to dial this number (3001 in our example) as soon as the Intercom line button on the IP phone is pressed. This is illustrated in Figures 7 and 8.

Figure 7 – Normal State

Figure 8 – After Pressing the “Intercom Line”

Please feel free to post any questions or comments. I hope this post was helpful!

Overview

One of the concepts that many junior voice engineers struggle with is the class of control features of Partitions and Calling Search Spaces. I remember feeling like I was banging my head against a wall repeatedly until I hit that Ah-hah moment and it all made sense.

Now there are many great explanations out there on the inter webs that are all technically correct and great. Some use the Lock + Key analogy like the CIPT1 Study guide and some use a White Pages/Directory Analogy. In my opinion these can leave people without a whole lot of voice experience more confused than when they started.

Purpose – What are Partitions and Calling Search Spaces used for anyway?

In my opinion Partitions and Calling Search Spaces are primarily used as a way to find “things” in the phone system. They are used so endpoints (Phones, Gateways, Trunks) can dial resources (Directory Numbers, On-net Route Patterns, Off-net Route Patterns, Translation Patterns). From an end-users perspective these resources are generally represented by a number. Because you can use these Dial Plan constructs to limit what resources an endpoint can find, it allows you the ability to implement Class of Service.

Sure, you could just put everything in the none partition and be done with it all together but Tom Hollingsworth has already told us why this is a bad idea over at his blog networkingnerd.net

Yeah, Ok. But you still haven’t told me what Partitions and Calling Search Spaces do!

Hold your horses. This is the part you’ve all been waiting for….< Insert Drum Roll > Here it is:

  • Partitions contain “things”
  • Calling Search Spaces find “things”

That’s it. I really believe this is the simplest way to think of how these two constructs work and behave.

Partitions

So we know that partitions can contain “things” but what exactly can they contain? A partition will only contain one or more of the following things:

  • Directory Numbers – These Directory Numbers represent other numbers in the Phone System that can be associated to Devices.
  • Route Patterns – Route Patterns represent off-net and on-net destinations and control how a call is routed to a destination. Route Patterns use Route Lists and Route Groups to send calls over a trunk or a gateway.
  • Translation Patterns –  I consider Translations Patterns an intermediate step to either matching a Directory Number or a Route Pattern. They are used to Transform the Calling or Called Party Information before using a Calling Search Space to find a suitable match. It is also worth noting that a Translation Patten can also be set to Block instead of route which can be useful when using the Line/Device Approach for implementing Class of Service
  • Transformation Patterns – Transformation Patterns are similar to Translation Patterns except they are not part of the CUCM’s routing construct. They are used for modifying Calling or Called Party Information for purposes of presentation but do not affect call routing. When you are using Transformation Patterns you should use dedicated Partitions and Calling Search Spaces for this function.

Calling Search Spaces

So if partitions contain “things” and Calling Search Spaces find “things”, what do they look in too find them? Well they look in partitions of course.

The following constructs use Calling Search Spaces to find things:

  • Devices – Phones use a CSS to find available patterns. This is generally referred to as the Device Calling Search Space
  • Directory Numbers – Directory Numbers also use a CSS to find available patterns. This is referred to as the Line Calling Search Space.
  • Trunks
  • Gateways
  •  Translation Patterns

This list was by no means exhaustive and there is a vast number of features that require Calling Search Spaces to be defined to control access to DN’s/Patterns for that feature. Things like Time of Day Routing, Presence, Call Forward Settings etc

When a Calling Search Space is looking through a series of ordered partitions it doesn’t work like an ACL in Cisco IOS that searches sequentially through the available partitions top-down until it finds a suitable match. No, It processes all listed partitions and matches on the best or longest match. The only time in which the order of the partitions matter is when you have equally specific patterns, in which the pattern in the partition closer to the top of the CSS list will win as a tie-breaker.

OK – So I think I get it, but I’ve noticed my Phone and my Directory Number both have a CSS. What’s up with that?

Well CUCM is flexible in that you could choose to set a CSS on just one of these elements and leave the other blank.  When you have both a Device and a Line CSS the CUCM combines the two into a single CSS with Line CSS above the Device CSS.

There is a good reason to use both. In order to effectively use features like extension mobility but enforce local dialling habits at remote offices it is recommended to set the Device CSS as too allow full access to the Dial Plan and then use the Line CSS to restrict unauthorised patterns from being dialled. The Partitions in your Line CSS should contain Translation Patterns that are set to block the restricted patterns and also have the “Urgent Priority” flag checked (It is on by default).